
0
Owner's of the iOptron Microscope & Magnifier ST-640 LCD Microscope gave it a score of 0 out of 5. Here's how the scores stacked up:

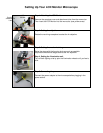
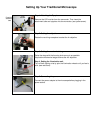

Transmission Microscopy
Light is transmitted through the sample. (For transparent or translucent samples)
Step 1. Turning on the illumination unit.
Turn on the microscope lighting by rotating the illumination wheel on the
bottom left of the microscope.
Step 2. Placing the sample.
Open the holding clamp and place the desired sample slide on the stage.
Gently release the holding clamp and let it hold fast to the sample slide.
Step 3. Centering the sample.
Adjust the mechanical stage “left to right” (blue arrow) or “in & out”
(yellow arrow) so that the sample is in the light cone.
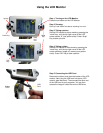
Step 4. Focusing the image.
Look through the eyepiece and focus image by slowly raising the stage
using the focusing knob.
Step 5. Increasing the magnification.
Change objective to 10x or 40x (see red arrow), or change the eyepiece
to 16x WF Ocular for a more detailed view. Readjust the focus as
necessary.
Step 6. Additional image adjustments.
After having selected the desired magnification, try to increase or
decrease the illumination intensity and to rotate the colored aperture
adjustment wheel to adjust contrast, resolution and optical wavelengths
desired. Readjust the focus as necessary.
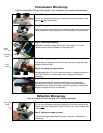
Reflection Microscopy
Light is reflected off the sample. (For opaque samples)
Step 1. Turning on the illumination unit.
Turn on the microscope lighting by rotating the illumination wheel at the
bottom right
of the microscope. Light will shine on top of the sample (see
yellow arrow).
Step 2. Getting the image you want.
To focus the image repeat steps 2 through 7 above in Transmission
microscopy.
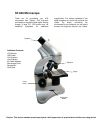
Focus
Knob
Illumination
Wheel
“In/Out”
Knob
“Left/Right”
Knob


Find Your Products By Category
Please Login
