
0
Owner's of the iOptron Telescope 6002 gave it a score of 0 out of 5. Here's how the scores stacked up:

Having trouble setting up or making it work? Email us at 900X70@ioptron.com We’ll be glad to help!
10
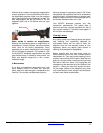
4. Using the Telescope
With the telescope aligned on the pole, you are
now ready to start your observations.
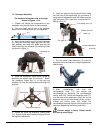
4.1. Getting familiar with you mount and
telescope
Before observing a celestial object, looking at
terrestrial objects during the day provides a good
exercise on how to operate the mount and
telescope.
4.2. Star observation
First of all you will need to choose an object that is
easy to find. The Moon or a bright star is a good
target to start with.
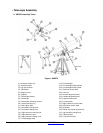
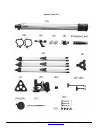
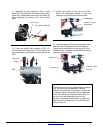
1. Slightly loose the telescope's Right Ascension
locking knob (14) and the Declination locking knob
(12), located close to the Declination adjustment
ring (13). By applying slight pressure by hand, the
telescope should now move freely along its two
axes.
2. Move the telescope along R.A. and Dec axes
and using the aligned finderscope to find the Moon.
With the object centered in the finderscope's cross
hairs, retighten the R.A. and Dec. knobs.
3. The Moon should be visible somewhere within
the FOV of main telescope. Focus the image by
adjusting the focusing knob (26). Center the Moon
by adjusting the mount using RA and DEC control
cable (27, 28).
4. You’ll find that the object immediately starts to
shift across the FOV. This motion is due to the
earth rotation. To "track" the object and keep it in
the FOV, turn the cable that controls R.A. slow
motion (27). Objects will appear to move faster at
higher magnifications. The Declination control
cable (28) is only used for centering the object and
not for tracking.
4.3. Observation Tips
When selecting a location for observing, get as far
away as possible from direct artificial light such as
street lights, porch lights, and automobile
headlights. The glare from these lights will greatly
impair your dark-adapted night vision. Set up on a
grass or dirt surface, not asphalt, because asphalt
radiates more heat, which disturbs the surrounding
air and degrades the images seen through the
telescope. Avoid viewing over rooftops and
chimneys, as they often have warm air currents
rising from them. Avoid observing from indoors
through an open (or closed) window, because the
temperature difference between the indoor and
outdoor air will cause image blurring and distortion.
Furthermore, it is preferable to let your telescope
reach outside ambient (surrounding) temperature
before starting an observation cycle.
Wait a few minutes to allow your eyes to become
used to the darkness before attempting any serious
observations. Use a flashlight with a red filter to
preserve your night vision when looking at star
maps or checking telescope parts.
Avoid touching the eyepiece during observation.
Vibration generated by this contact may cause the
view to move. Also avoid observing from locations
where terrestrial vibrations are significant.
Observing from the upper floors of buildings may
also cause the images vibrating.
Warning! Never attempt to observe the sun
through your telescope without a proper solar filter.
Observing the sun, even for a fraction of a second,
may cause immediate and irreversible harm to your
eye as well as physical damage to the telescope.
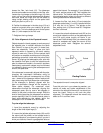
Some atmospheres may deform the image that you
are observing. Planets in particular, when observed
low on the horizon, often present a fuzziness – the
same object when observed at a higher altitude in
the sky may benefit from far better definition and a
far higher degree of contrast. Furthermore, air
turbulence in the upper layers of the atmosphere
may cause "trembling" to affect the view observed
through the eyepiece. In this case, reduce the
magnification factor until the picture stabilizes.
Keep in mind that even a small sized but bright and
well defined image will reveal far more interesting
details than a larger, but less bright and slightly
fuzzy, view.
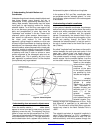
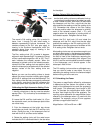
4.4. How to use setting circles
Understanding the Setting Circles
The setting circles on an equatorial mount enable
you to locate celestial objects by their “celestial
coordinates”. The R.A. and Dec. values for
celestial objects can be found in any star atlas or
star catalog.


Find Your Products By Category
Please Login
