
0
Owner's of the iOptron Telescope 6002 gave it a score of 0 out of 5. Here's how the scores stacked up:
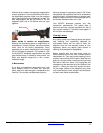

Having trouble setting up or making it work? Email us at 900X70@ioptron.com We’ll be glad to help!
8
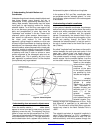
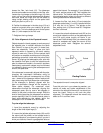
constellation of Pegasus. The coordinates of the
Right Ascension range from 0h 0mn 0s to 24h 0mn
0s (not inclusive). Therefore, there are 24 primary
R.A. lines located at 15 degree intervals along the
celestial equator. The objets that are further away,
eastwards, from the primary Right Ascension grid
line (0h 0mn 0s) carry rising R.A. coordinates.
Consequently, once it is possible to specify the
position of all of these celestial objects using their
Right Ascension and Declination coordinates the
task of searching for objects (especially low
brightness stars) using the astronomer's telescope
may be simplified. The digital, R.A. (16) and Dec.
(13) setting circles for your telescope can be made
up, in practice to read the object's coordinates, by
positioning it close to the telescope's telescopic
field of view (FOV). The advantage of using these
setting circles is however only justified after first
correctly aligning the telescope with the North
Celestial Pole.
3. Getting Started
Before you can use the telescope effectively, there
are still a few steps to be performed.
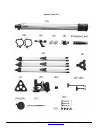
3.1. Selecting an Eyepiece
1. Always begin viewing with the lowest power
eyepiece. (Note: a 20 mm focal length eyepiece is
lower power than a 12.5 mm one.) A formula can
be used to determine the power of each eyepiece:
Telescope focal length divided by eyepiece focal
length equals magnification. Ex. 900mm ÷ 20mm =
45X (magnification)
2. Included with this telescope is a 45° Erecting
Diagonal Prism. The Erecting Diagonal Prism is
used to erect the image you will see. Astronomical
telescopes are designed in such a way that the
image you see may be UPSIDE DOWN and
REVERSED. This is acceptable for viewing
celestial bodies.
3.2. Focusing Telescope
1. After selecting the desired eyepiece aim the
main telescope tube at a land-based target at least
200 yards away (e.g. A telephone pole or a
building). Fully extend focusing tube by turning the
focus knob.
2. While looking through selected eyepiece, slowly
retract focusing tube by turning focusing knob until
object comes into focus.
3.3. Aligning Finderscope:
The extended field of vision offered by the 5x24
mm finderscope (8) makes it easier to aim at an
object before viewing it through the main telescope
tube with a higher magnification.
1). Remove the front lens cover (33) from the
sunshade (29). Look through Main Telescope Tube
and establish a well-defined target (see focusing
telescope section). Tighten all lock knobs
(Declination, Latitude, Right Ascension, Horizontal
Axis) so that telescope’s aim is not disturbed.
2). Looking through the finderscope, alternate
tightening or loosing each finderscope Adjustment
Screw (9) until the crosshairs of the finderscope
are precisely centered on the same object already
centered in Main Telescope Tube’s field of view.
3). Now, objects located with the finderscope first
will be centered in FOV of the main telescope.
They can be focused by turning the finderscope’s
threaded eyepiece. The image in the finderscope
will be reversed.
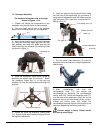
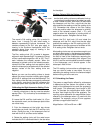
3.4. Balancing the Telescope
To insure smooth movement of the telescope on
both axes of the equatorial mount, it is imperative
that the optical tube be properly balanced. We will
first balance the telescope with respect to the right
ascension (R.A.) axis and then in the declination
(Dec.) axis.
1. Keeping one hand on the telescope optical tube
(11), loosen the R.A. lock knob (14). Make sure the
Dec. lock knob (12) is locked. The telescope
should now be able to rotate freely about the R.A.
axis. Rotate it until the counterweight shaft (17) is
parallel to the ground (i.e., horizontal).
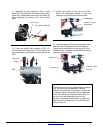
2. Now loosen the counterweight lock knob (20)
and slide the weight along the shaft until it exactly
counterbalances the telescope. That’s the point at
which the shaft remains horizontal even when you
let go of the telescope with both hands.
3. Retighten the counterweight lock knob. The
telescope is now balanced on the R.A. axis.
4. To balance the telescope on the Dec. axis, first
tighten the R.A. lock knob (14), with the
counterweight shaft (17) still in the horizontal
position.
5. With one hand on the telescope optical tube (11),


Find Your Products By Category
Please Login
